Starting an online business has never been easier, thanks to Shopify Store solutions that allow anyone to launch, manage, and scale an eCommerce business with minimal effort. But building a store is only half the job. To actually receive payments from customers, you must integrate a secure and reliable payment gateway.
So, how do you add a payment gateway to your Shopify store easily—without technical headaches? That’s exactly what this guide will walk you through. Whether you’re just creating a Shopify store or already running a successful Shopify online store, this article will help you understand every step clearly.
What Is a Payment Gateway in Shopify?
A payment gateway is a service that processes customer payments securely. It connects your online store Shopify checkout page to banks, card networks, and digital wallets. Without a payment gateway, customers can’t complete purchases—simple as that.
In every Shopify Store, payment gateways ensure:
- Secure transactions
- Multiple payment options
- Fast checkout experience
- Fraud protection
That’s why choosing and setting up the right gateway is critical for your business success.
Why Payment Gateway Integration Is Important for Shopify Stores
No matter if you make a Shopify store for dropshipping, digital products, or physical goods, payment integration directly impacts conversions and customer trust.
Here’s why it matters:
- Improves customer experience: Customers prefer familiar payment options.
- Boosts conversion rates: Fewer checkout drop-offs.
- Builds trust: Secure gateways reassure buyers.
- Supports global sales: Accept international payments easily.
Most popular Shopify stores succeed because they offer flexible and smooth payment options.
Types of Payment Gateways Supported by Shopify
Before adding a gateway, you should know your options. Shopify supports different types of gateways for Shopify stores worldwide.
1. Shopify Payments
Shopify’s built-in payment solution. No third-party setup required in supported countries.
2. Third-Party Payment Gateways
Examples include Razorpay, PayPal, Stripe, Skrill, and more. These are ideal if Shopify Payments isn’t available in your region.
3. Manual Payment Methods
Cash on Delivery (COD), bank transfer, or custom payment methods.
Each sample Shopify store may use different gateways based on location and audience.
Things to Check Before Adding a Payment Gateway
Before you add a payment gateway to your Shopify Store, make sure:
- Your store currency is set correctly
- Your business address and details are accurate
- Your store is live or password-protected but complete
- You have valid bank or wallet details
This ensures smooth approval and avoids payment delays.
Step-by-Step: How to Add a Payment Gateway in Shopify Store Easily
Now let’s get into the main part—adding the payment gateway.
Step 1: Log in to Your Shopify Admin Dashboard
Go to your Shopify admin panel using your registered email and password. This is where you control your Shopify online store.
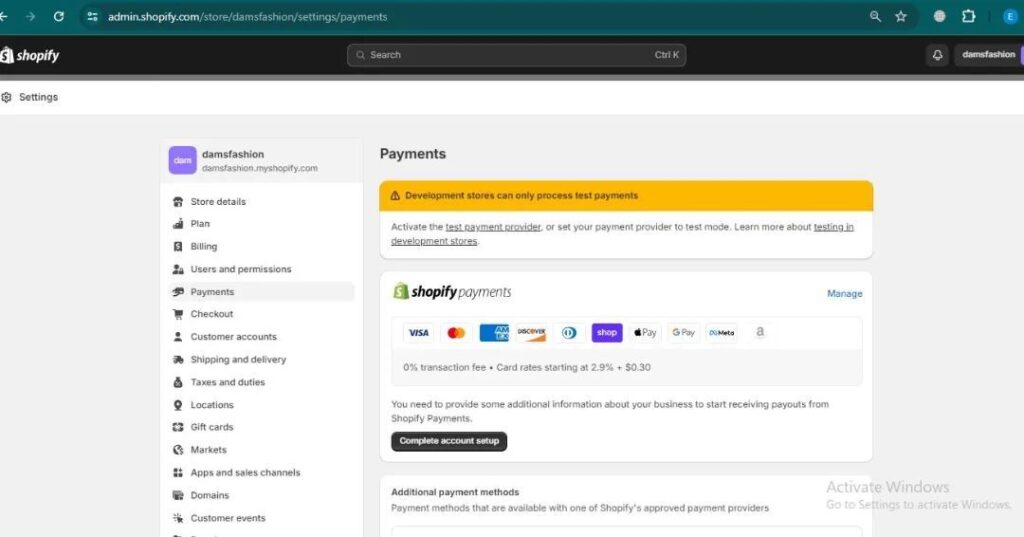
Step 2: Navigate to Payments Settings
From the dashboard:
- Click Settings
- Select Payments
This section controls all payment options for your online store Shopify setup.
Step 3: Choose a Payment Provider
Under the “Payment providers” section, you’ll see options like:
- Shopify Payments
- Third-party providers
- Manual payment methods
If you’re using a third-party provider (like Razorpay), click Add payment methods.
Step 4: Search and Select Your Payment Gateway
Search for your desired gateway in the list. Shopify supports hundreds of gateways globally, making it easy to scale Shopify stores internationally.
Once found, click Activate.
Step 5: Enter Payment Gateway Credentials
You’ll need to enter details such as:
- API key
- Secret key
- Merchant ID
- Account email
These credentials are provided by your payment gateway after registration.
Step 6: Save and Test the Payment Gateway
After entering the details:
- Click Save
- Enable test mode (if available)
- Place a test order to confirm everything works
Testing ensures your Shopify Store checkout runs smoothly before real customers arrive.
How to Add Multiple Payment Gateways in Shopify
You’re not limited to just one gateway. Many Shopify stores use multiple payment options to serve different customers.
You can:
- Add PayPal for global buyers
- Add Razorpay or Stripe for card and UPI payments
- Enable COD for local customers
This flexibility is one reason people choose to build a store on Shopify instead of other platforms.
Common Payment Gateway Issues and How to Fix Them
Even well-built stores can face issues. Here are common problems and solutions:
Payment Gateway Not Showing at Checkout
- Check currency compatibility
- Ensure gateway is activated
- Confirm country eligibility
Payment Failed or Declined
- Verify API credentials
- Check gateway account status
- Ensure SSL is enabled
Delayed Settlements
- Confirm bank details
- Review settlement schedule with the provider
Most issues are easy to fix if your Shopify Store settings are configured properly.
Best Practices for Payment Gateway Optimization
To get the most out of your Shopify online store, follow these tips:
- Offer at least 2–3 payment options
- Use trusted, well-known gateways
- Enable express checkout where possible
- Keep checkout pages simple and fast
- Monitor failed transactions regularly
These strategies are commonly used by popular Shopify stores to maximize sales.
Can You Add a Payment Gateway After Creating a Shopify Store?
Yes, absolutely. Whether you’re just creating a Shopify store or running an established business, you can add or change payment gateways anytime from your admin dashboard.
Even if you buy a Shopify store, payment settings can be customized easily to match your business needs.
Examples of Payment Setup in Sample Shopify Stores
Looking at a sample of Shopify store setups can help you understand best practices. Most successful stores:
- Use multiple gateways
- Enable local payment methods
- Optimize checkout flow
- Regularly test transactions
These strategies help convert visitors into paying customers.
Final Thoughts
Adding a payment gateway to your Shopify Store doesn’t have to be complicated. With Shopify’s user-friendly interface and wide gateway support, even beginners can set up secure payments in minutes.
Whether you want to make a Shopify store, scale existing Shopify stores, or optimize a Shopify online store, payment integration is a critical step toward success. Take the time to choose the right gateway, test it properly, and keep your checkout experience smooth.
Frequently Asked Questions (FAQs)
1. Is it free to add a payment gateway in a Shopify Store?
Shopify does not charge for adding gateways, but transaction fees may apply depending on the provider.
2. Can I use more than one payment gateway?
Yes, most Shopify stores use multiple gateways to support different payment methods.
3. Which payment gateway is best for Shopify?
It depends on your location and audience. Shopify Payments, Stripe, PayPal, and Razorpay are popular choices.
4. Do I need coding skills to add a payment gateway?
No. Shopify’s dashboard allows you to add gateways without any technical knowledge.
5. Can I change payment gateways later?
Yes, you can modify or replace payment gateways anytime in your Shopify Store settings.